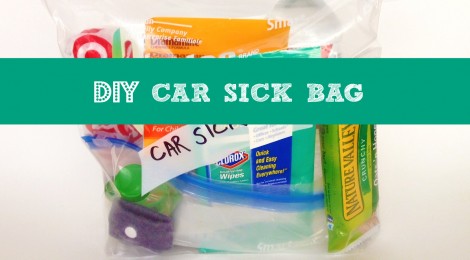
DIY Car Sick Bag
Have you ever gone on a road trip and one of your kids says, “I’m not feeling so good.” For me, I dread those words. I know that when I turn around, I will see the palest kid on earth with white lips, a worried forehead and glassy-scared eyes. I will know that he is about to hurl Honey Nut Cheerios all over my newly cleaned car. We take several road trips and often to the mountains, so I’ve learned how to protect my kids from getting car/motion sickness, but more importantly, how to protect my car from being vomited on. Every mom, dad, grandma, grandpa, aunt, uncle, teacher, bus driver, chauffeur, taxi driver and babysitter needs to make a DIY Car Sick Bag.
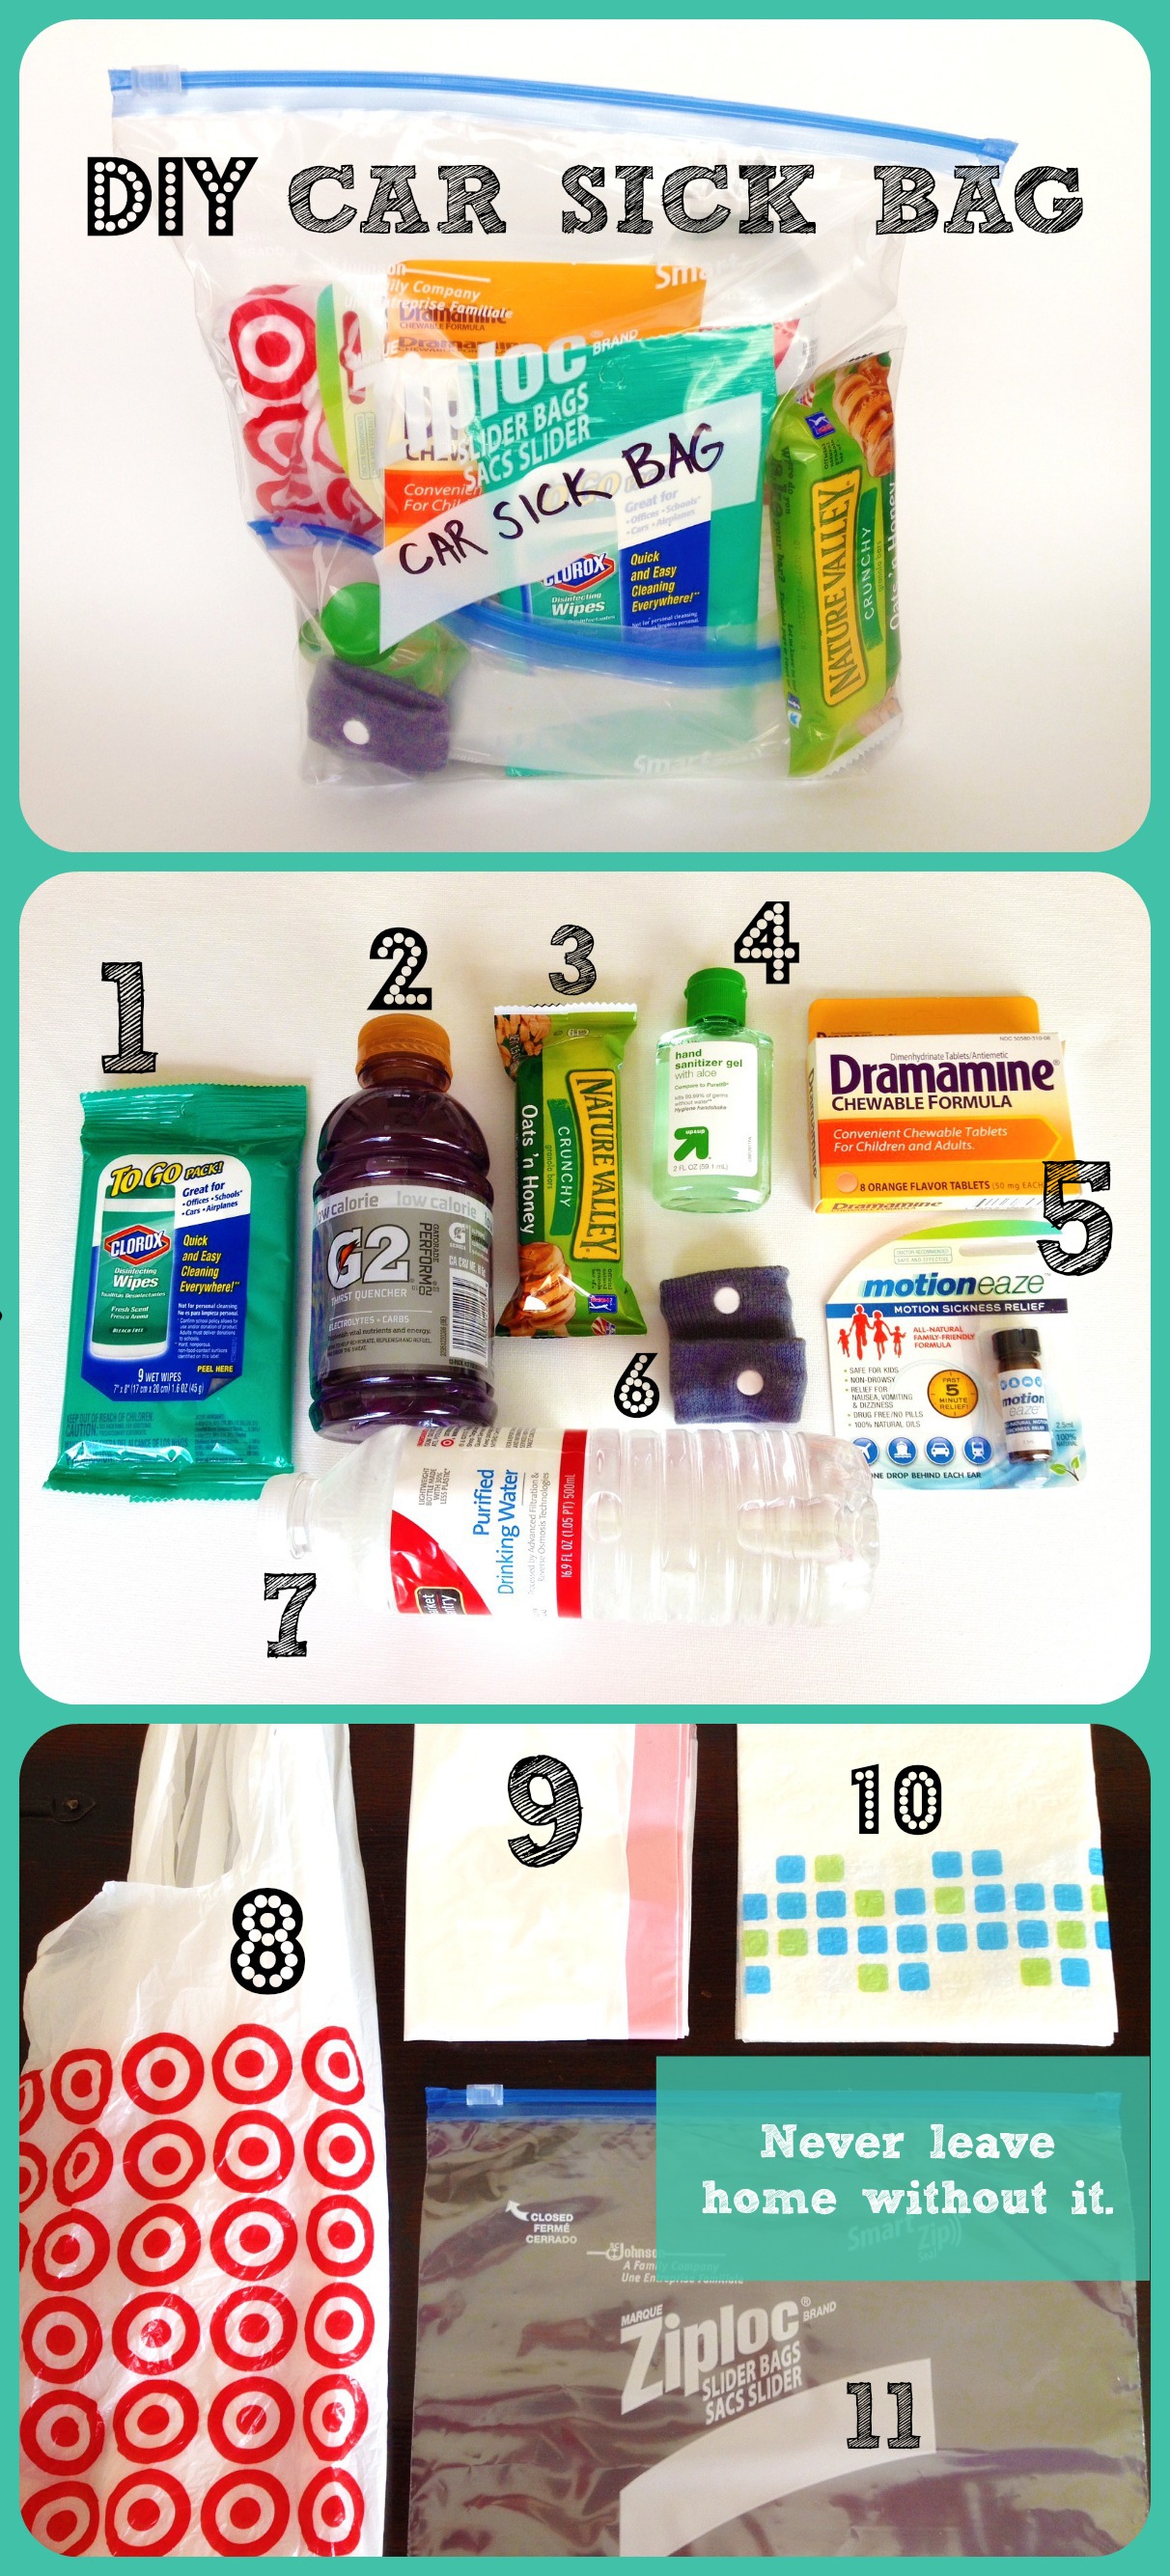
To make your DIY Car Sick Bag, place all the items in some sort of bag, I used a large Ziploc bag, and store somewhere accessible in your car–under a seat, in the middle console, in the glove box, etc. If you store it in the trunk, then it is too far away and too hard to get when you really need it.
1. Travel Clorox Wipes: Yes, to help clean up chunks.
2. Gatorade: To help your victim get re-hydrated or to help your child stay hydrated so he doesn’t spew all over his little brother.
3. Light Snack: To help settle your child’s tummy or have something in his tummy to take medicine.
4. Hand Sanitizer: To wash his hands…and yours.
5. Motion Sickness Medication: If your child is prone to car sickness, take this before you travel or before you get into the mountains. To make it easier on your child, make sure you have chewable. Read and follow all the directions and talk to your doctor before you give your child this medication.
6. Motion Sickness Wrist Bands: This is supposed to naturally help with motion sickness. We have used these, but I’ve also given my son Dramamine at the same time…I didn’t want to chance it.
7. Bottled Water: Use this to have your child rinse his mouth out, wash his hands, wash his face, wash your shirt…
8. Grocery Plastic Bag: Use this bag as a second throw-up bag or to double bag the Ziploc throw-up bag (#11).
9. Trash Bag: Use this to store items that have been thrown up on like coats, bags, iPads, etc. You could also use it to protect items before chunks start flying.
10. Napkins: Use these where ever needed. To dry hands, face or tears.
11. Gallon Ziploc Slider Bag: This is the most important item in your kit! This is where ground zero takes place. Use this bag for your child to throw up into first. It is easy to seal with the slider and will totally contain the vomit. When your child is done, put this used bag inside of the grocery plastic bag so it is double bagged and won’t leak. I usually put 2-3 large Ziplock bags in my kit.
Here is a great article with tips on How to Avoid Car Sickness, but if it can’t be avoided you will be so happy you made your DIY Car Sick Bag. Good luck and happy, puke-free travels!


[…] you’ve got a family member who is prone to being car sick, keep one of these relief bags from Cul-de-Sac Cool ready to help them feel better. You’ll likely have most of the items already at home, and the […]
[…] for their shape on the side of the mountain. It is a scary, beautiful drive. We broke out our DIY Car Sick Bag during the drive to help out Son #2 on the way up. Make sure you bring water in the car and […]
Did you know , it also good to add. Cat litter to soak up and deodorize , vomit, or pee. Takes the smell away, turn liquids more solid for easier cleanup.they use this trick on school buses.
We need to add cat litter to our car sick bag! Great tip!
i put the “throw up bag” in a sand bucket. It’s easier for my 4 yr old to grab and hang her head in. We tried just a bag and she would miss sometimes. We have been dealing with the car sickness since we turned her car seat around. Sometimes Benadryl helps. I remind her not to look out the side window. Watching her DVD player in front of her helps sometimes. We stop a lot and let her walk around.
Uggg. No fun. I feel for you. My middle son, who is prone to car sickness, seems to have gotten better the older he gets. Hopefully this will be your case with your little one. Great idea about the bucket!!! Totally makes sense. Hang in there and Happy Holidays!
Add some alcohol wipes, the little squares from a first aide kit, to your motion sickness kit. Open it a smell it every few minutes while waiting for the meds to work. Helps with stop nausea quickly but only for a short time, but long enough to keep from vomiting.
Great tip! We will have to try it out when we head back to the mountains this summer!
As someone who has struggled with car sickness their whole life, I have tried all of these things!! The bands can really help. I would also like to add Bonine. It is honestly made my life SO DIFFERENT when traveling. It works wonders. I’m not sure what ages can take it, but it is a chewable tablet as well, and you can pick it up and most Walgreens or CVS in the stomach area. It really helps with dizziness too, but for me it works better than Dramamine, especially considering my body is probably immune to it by now lol and it can’t hurt to alternate! Love the bag idea!!
We keep solo cups in my sons who gets car sick cup holder he is only three but pukes in them perfectly a lot easier to puke in then a ziplock bag. But we have used zip licks before too. The good thing about the cup is it is accessible to him and ready a moments notice. I keep a whole stack in my car. Along with the other items mentioned.
Great idea and good tip! Although, when he gets bigger, if he hasn’t grown out of being car sick, you may need a bigger cup!!!
Thanks for this post. I also have suffered with car sickness since childhood. Over the many years, I have discovered my own “remedies” so I don’t have to take motion sickness meds while traveling. I stay away from heavy meals, acidic foods, drinks, and don’t read until I feel “stable”. I wish my mom had known about some of these tips you and others posted. There were no zip lock bags when I was a kid!😂 But we had Dramamine. I also suffer from migraines and try to keep a cool cloth in a baggie while traveling. It helps with nausea and headaches. Another product that I never leave without is from Origins called Peace of Mind. It smells incredible. You place small dabs on your pulse points for relief. It is minty and nice.
I’m going to have to check out your Origins Peace of Mind. We just got back from Colorado. My middle son got sick on our way out of the mountains because he was watching a movie. We thought he had grown out of getting carsick. Lesson learned, no movies while leaving the mountains!!